Machine-translated by Google. Questions are authored in English.
Top

Paper Folding and Cutting Questions and Answers

1.

A piece of paper is folded and cut as shown in below question figure. From the given answer figures, choose the option how it will appear when opened?

Three steps: a rectangle with a dotted diagonal fold line, the folded triangle with a second fold, and the folded piece with a small oval holding two circles cut near its edge

Exam Year(s)

DSSSB - 2023,

Answer: D

The official key is option (D). What was confirmed: the sheet is folded twice and the cut, a half-oval holding two small circles, is made at the folded edge, so unfolding joins the cut to its mirror copy into whole ovals. Option (A) shows three ovals and option (B) four, and neither fits the cut made in the figure, while (C) and (D) each show two ovals standing apart at opposite corners. What was not confirmed independently is the exact position and orientation that separates (C) from (D); those follow the printed key, and nothing contradicts it.

Please log in or register to report this question.

2.

Find out from amongst the four alternatives as to how the pattern would appear when the transparent sheet is folded at the dotted line.

A sheet split by a vertical line and a dotted horizontal fold line, with a pentagon holding a downward arrow and a triangle holding an upward arrow below the fold line

Exam Year(s)

DSSSB - 2023,

Answer: A

Option (A) is the answer. The transparent sheet is folded along the horizontal dotted line, so the lower half, holding the pentagon and the triangle, is laid over the upper half. Folding turns each figure over top to bottom. The pentagon with the downward arrow therefore appears point-down with an upward arrow, and the triangle that points up with an upward arrow appears point-down with a downward arrow, each staying in its own column, pentagon on the left and triangle on the right. Option (A) shows exactly this. Option (B) keeps both arrows pointing down and (C) keeps the arrow of the triangle pointing up, while (D) leaves the triangle pointing up and the pentagon upright.

Please log in or register to report this question.

3.

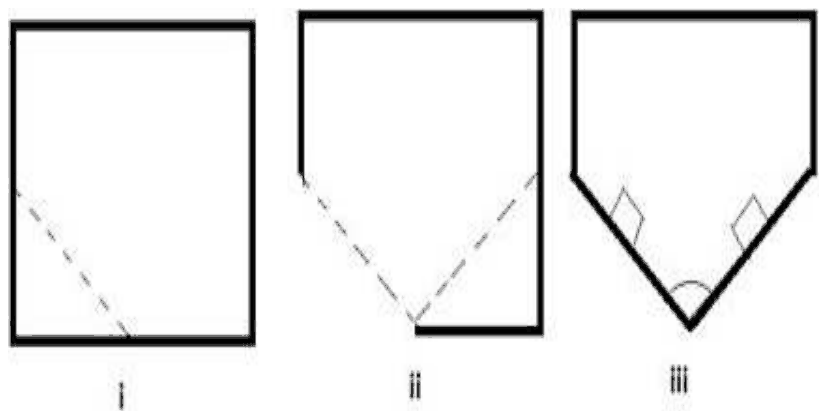
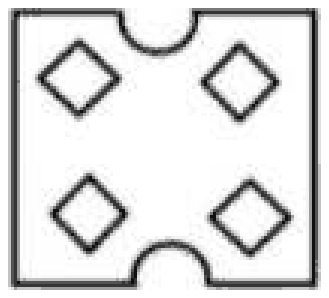
The sequence of folding a piece of paper (figures i and ii) and the manner in which the folded paper has been cut (figure iii) is shown in the following figures. Select a figure from among the given options that would most closely resemble the unfolded form of figure (iii).

Paper folded twice along dashed lines and then cut, figures i, ii and iii

Exam Year(s)

DSSSB - 2023,

Answer: B

The unfolded paper looks like option 2.

Unfold the paper step by step, reflecting each cut across the fold line it was made over. The cuts in the last figure are on the folded corner of the paper, so after unfolding the cut-outs appear only in the lower part: two diamond-shaped holes and a semicircular notch on the bottom edge, which is what option 2 shows.

Options 1 and 3 show four diamond cuts and option 4 shows an extra notch at the top, none of which can come from the cut in the folded corner.

A useful check is the number of cut-outs. Each cut on a folded sheet is repeated on every layer, and the layers at the cut here make two diamonds and a notch, not four diamonds. The notch lies on the lower edge, because that is the edge where the folded corner sat, and this matches option 2 only.

Please log in or register to report this question.

4.

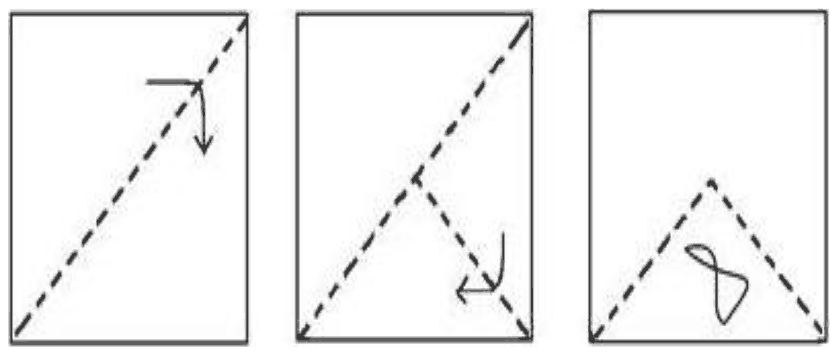
The sequence of folding a piece of paper and the manner in which the folded paper has been cut is shown in the following figures. How would this paper look when unfolded?

Paper folded twice along dashed lines and then cut with a bow-tie shaped hole

Exam Year(s)

DSSSB - 2023,

Answer: C

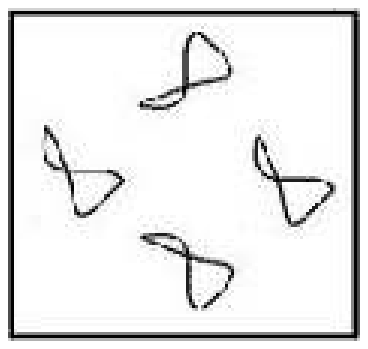
The unfolded paper looks like option 3.

The paper is folded along the diagonal and then again, and a bow-tie shaped hole is cut near the folded point. Unfolding reflects that cut across both fold lines, so four copies appear arranged round the centre of the sheet, each a mirror image of its neighbours. Option 3 shows the four copies turned the way that two reflections produce.

The other options show copies that are turned the wrong way, so they cannot be produced by reflecting the cut across the folds.

To check, imagine opening the second fold first. The cut then appears twice, once on each side of the first fold line, as mirror images. Opening the first fold repeats the pair across the diagonal, giving four copies. The copies in option 3 are mirror images of each other in just that way.

Please log in or register to report this question.

5.

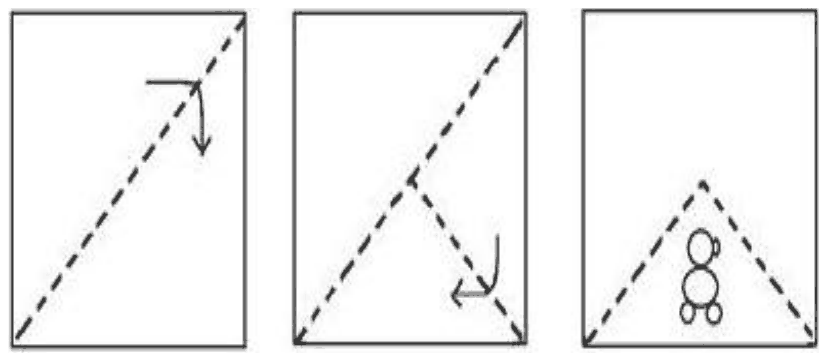
The sequence of folding a piece of paper and the manner in which the folded paper has been cut is shown in the following figures. How would this paper look when unfolded?

Paper folded twice along dashed lines and then cut with a small figure shaped hole

Exam Year(s)

DSSSB - 2023,

Answer: C

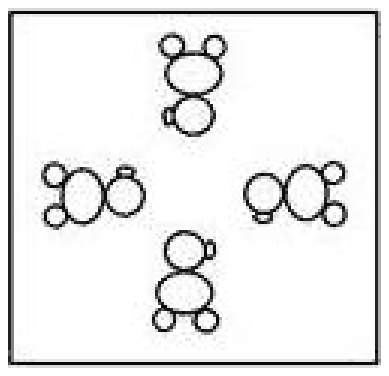
The unfolded paper looks like option 3.

The folds and cut are the same as in the previous question with a small figure in place of the bow-tie. Unfolding reflects the cut across each fold line, so four copies appear round the centre of the sheet, the upper and lower ones facing each other and the left and right ones facing each other. Option 3 shows the four copies placed and turned in that way.

Options 1, 2 and 4 turn one or more of the copies the wrong way, which a reflection cannot do.

The same method works here as in the previous question. Open the last fold to get two mirror images of the cut, and then open the first fold to get four. The copies lie near the centre because the cut was made at the folded point. Only option 3 shows the four copies mirrored correctly.

Please log in or register to report this question.

6.

A rectangular paper of 20 cm × 8 cm is folded 3 times. Each fold is made along the line of symmetry, which is perpendicular to its long edge. The perimeter of the final folded sheet (in cm) is

Exam Year(s)

GATE CS - 2024, GATE AE - 2024, GATE AG - 2024,

Answer: A

The perimeter is 18 cm.

Each fold halves the current long edge, and after each fold the long edge has to be checked again:

  1. 20 cm × 8 cm: fold across the 20 cm edge to get 10 cm × 8 cm.
  2. 10 cm × 8 cm: the long edge is still 10 cm; fold to 5 cm × 8 cm.
  3. 5 cm × 8 cm: now the long edge is 8 cm; fold to 5 cm × 4 cm.

The perimeter is \(2(5 + 4) = 18\) cm.

21 cm is the trap: it halves the 20 cm side all three times, giving 2.5 cm × 8 cm, and ignores that the long edge changes after the second fold.

Please log in or register to report this question.
7.

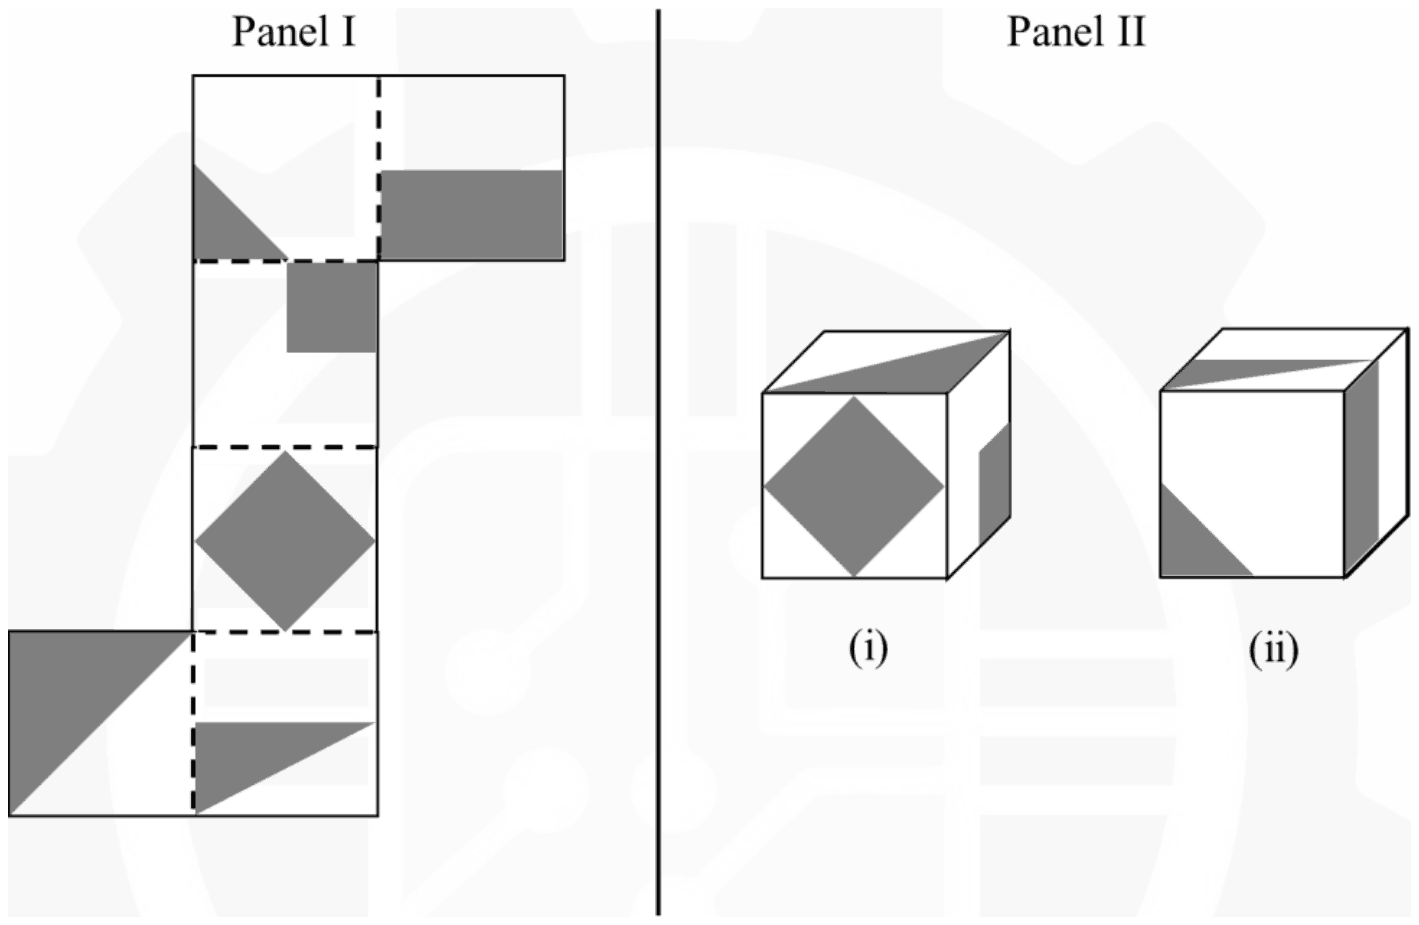
A paper shown in Panel I is folded along the dashed lines (- - -) to construct a cube. The shaded regions shown in Panel I appear on the outer surface of the cube. Referring to cubes shown in Panel II, which one of the options is correct?

Panel I: a net of six squares with dashed fold lines, each square carrying a grey shape (corner triangles, a half-shaded square, a small square, a diamond, a wedge). Panel II: two cubes, (i) and (ii), showing three shaded faces each

Exam Year(s)

GATE AE - 2026,

Answer: A

The answer is Only (i) can correspond to the unfolded cube in Panel I.

Fold the net with the diamond face at the front. The face above it in the net (small square in its top-right quarter) becomes the top, the topmost face (small corner triangle) becomes the back, the face below the diamond (thin wedge) becomes the bottom, the half-shaded face attached to the back becomes the right side, and the face with the diagonal half shaded becomes the left side.

Cube (i) is this cube turned a quarter turn about the front-to-back axis: the diamond stays in front, the diagonal-half face comes on top with its shaded half towards the front-right corner, and the small-square face moves to the right with the square in its lower back quarter, exactly as drawn.

Cube (ii) shows the corner-triangle face in front and the wedge face on top, which fixes the cube as the standard one turned half a turn about the left-right axis. The right face is then the half-shaded face, whose shaded half must lie along the bottom edge. Cube (ii) instead shows a vertical strip along the front edge, so it cannot come from this net. That rules out 'Only (ii)', 'Both' and 'Neither'.

Please log in or register to report this question.
8.

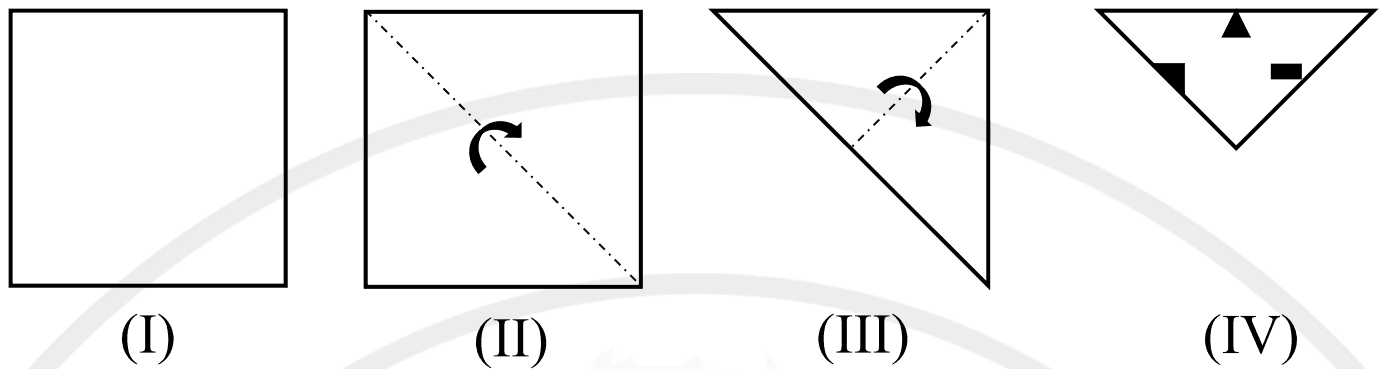
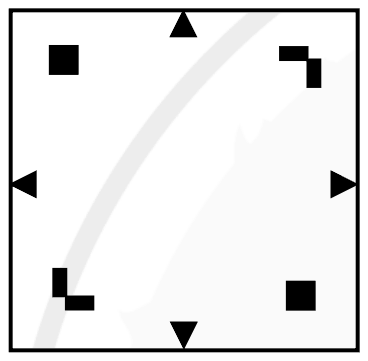
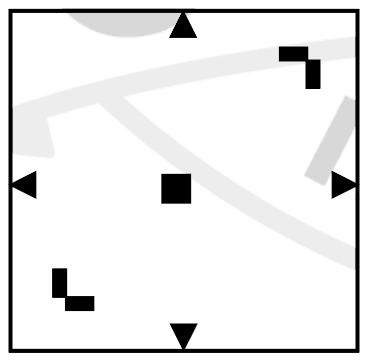
A square paper, shown in figure (I), is folded along the dotted lines as shown in the figures (II) and (III). Then a few cuts are made as shown in figure (IV). Which one of the following patterns will be obtained when the paper is unfolded?

Note: The figures shown are representative.

(I) a square; (II) folded along the diagonal from top-left to bottom-right; (III) the triangle folded again from its right-angle corner to the middle of the long side; (IV) the final triangle with a triangle cut on the top edge, a notch on the left edge and a slot near the right edge

Exam Year(s)

GATE AG - 2025,

Answer: A

The unfolded pattern is (A).

The first fold is along the diagonal from the top-left to the bottom-right corner, and the second folds the remaining triangle along the line from its right-angle corner to the centre, leaving the top quarter of the square with four layers. Unfolding repeats each cut in all four triangular quarters, reflected across the two diagonals.

The triangular cut at the middle of the top edge, pointing outwards, therefore appears at the middle of all four edges, each pointing outwards: up at the top, down at the bottom, left and right at the sides. The notch on the left edge of (IV) lies on the first fold line, so it opens into a square hole, and that square appears in two opposite corners, top-left and bottom-right. The slot near the right edge lies beside the second fold line and opens into a pair of bars, forming the hook shapes at the top-right and bottom-left.

Option (B) shows diamonds instead of squares, option (C) has the top and bottom triangles pointing inwards, and option (D) has a single square at the centre, so only (A) matches.

Please log in or register to report this question.

9.

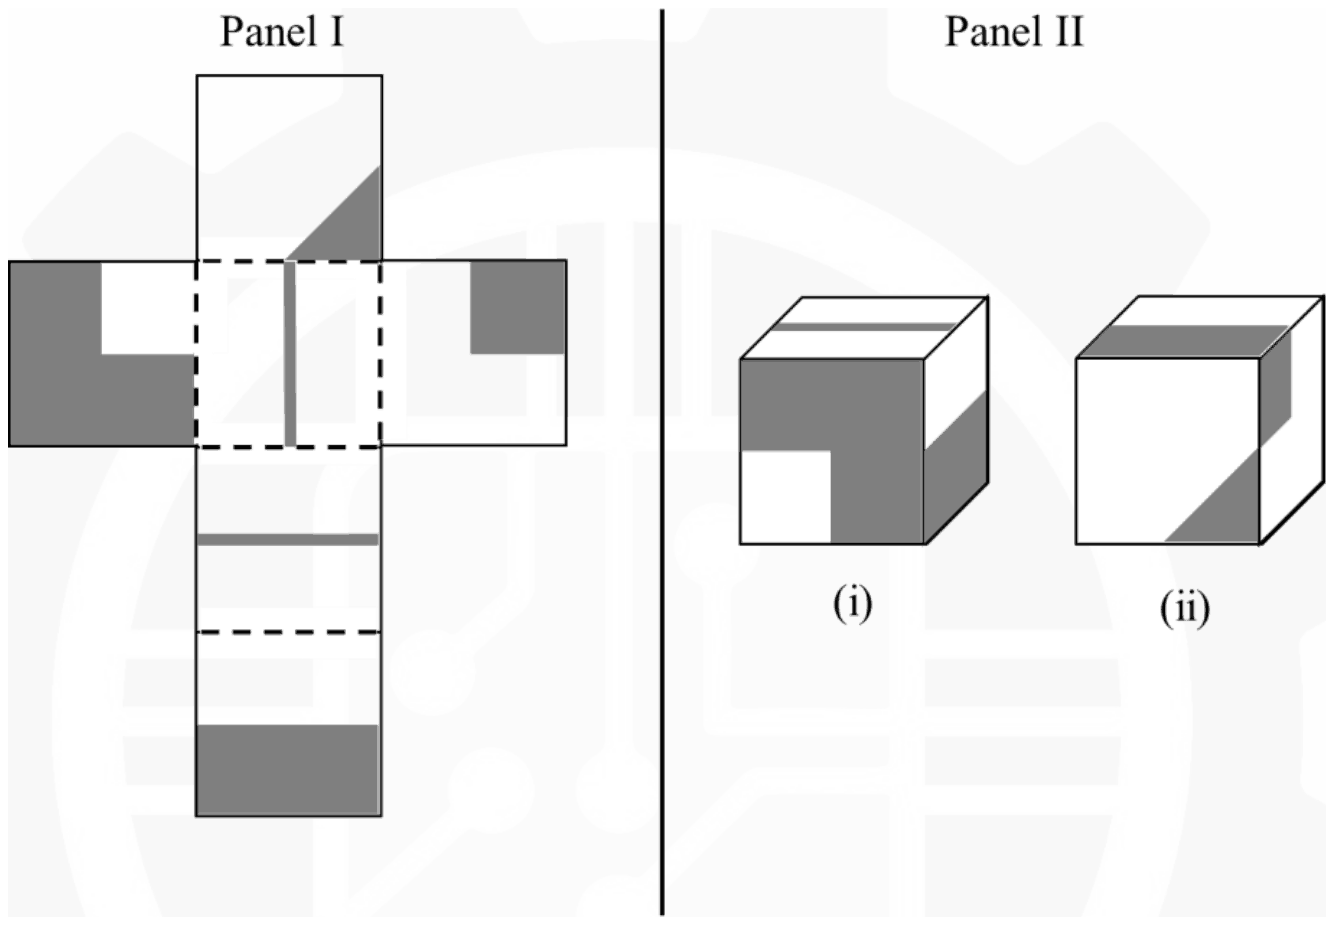
A paper shown in Panel I is folded along the dashed lines (- - -) to construct a cube. The shaded regions shown in Panel I appear on the outer surface of the cube. Referring to cubes shown in Panel II, which one of the options is correct?

Panel I: a cross-shaped net of six squares with shaded parts and dashed fold lines. Panel II: two shaded cubes labelled (i) and (ii)

Exam Year(s)

GATE Mathematics - 2026, GATE Life Sciences - 2026, GATE AG - 2026,

Answer: B

Only (ii) can be made from the sheet.

Because the printed side ends up outside, the centre square (with the thin vertical line) becomes one face, call it the top, and the squares above, left, right and below it fold down as the four sides. The bottom square of the column folds under as the face opposite the centre. The square with the corner triangle has its triangle in the corner it shares with the centre square and the right-hand square; the right-hand square's shaded quarter sits in its corner farthest from the centre and next to the triangle square; the last square is shaded on the half next to the triangle square once folded.

Cube (ii): put the triangle face in front with the triangle at its lower right. The right-hand square then lies on the right and the last square on top. The shaded quarter of the right face lands at its upper front corner, and the shaded half of the top face lies along the front edge, exactly as drawn.

Cube (i): its front is the left-hand square, the only face shaded all over except one quarter. With that white quarter at the lower left, the face drawn on top is the square with the thin line, and the line must run from front to back, parallel to the edge shared with the centre face. Cube (i) shows it parallel to the front edge, so (i) cannot come from the sheet. That rules out the options naming (i) and the 'neither' option.

Please log in or register to report this question.

10.

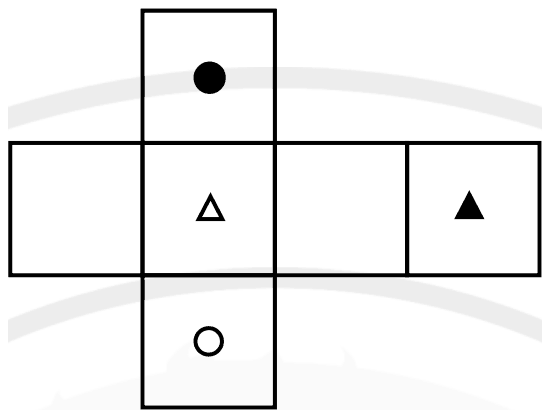
The paper as shown in the figure is folded to make a cube where each square corresponds to a particular face of the cube. Which one of the following options correctly represents the cube?

Note: The figures shown are representative.

A cross-shaped net of six squares: a middle row of four squares, blank, open triangle, blank, filled triangle; a filled circle above the open-triangle square and an open circle below it

Exam Year(s)

GATE CS - 2025,

Answer: A

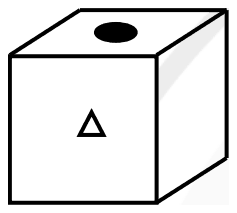
The correct cube is (A).

Fold the net around the square with the open triangle. The squares directly above and below it, the filled circle and the open circle, become two of its neighbouring faces, opposite each other. In the row of four, alternate squares are opposite faces: the open triangle is opposite the filled triangle, and the two blank squares are opposite each other.

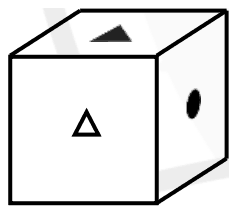
Cube (A) shows the open triangle in front, the filled circle on top and a blank face on the right. All three are mutual neighbours in the net, so this view is possible.

Cube (B) shows the filled triangle beside the open triangle, but those two faces are opposite. Cube (D) has the filled triangle on top of the open triangle, the same impossibility. Cube (C) shows two blank faces meeting at an edge, but the two blank squares are opposite each other.

Please log in or register to report this question.

Loading…